DO NOT PRETEND TO BE A REDBOX EMPLOYEE.
MISREPRESENTING YOURSELF HARMS THOSE WHO WANT TO REMOVE KIOSKS AND HURTS LOCAL RECYCLER AND JUNK REMOVAL BUSINESSES.
Even if you have verbal permission from a Store Manager or Authorized Personnel, its best to always obtain it in writing as well, aka a contract, to protect against any disputes during the removal process.
Do not try to move these machines by yourself. Doing so, you assume the risks involved without having an additional person(s) with you on site. Wear pants, gloves, and tennis shoes—though lace-up work shoes/boots are preferable and professional—and make sure every tool, including a dolly, is rated for the necessary weight before attempting to remove any kiosk from retailers or gas stations.
#Locating a Redbox
When finding a place to acquire a unit, tools such as the Redbox Database where users can reports statuses of Redboxes, the Redbox Database Map or alternatively Google Maps can prove to be useful tools in the field. After you have found a suitable location, make sure to verify the unit is still in the listed location, either by physically evaluating the store, looking on Google maps, or by contacting the store. Avoid requesting to take the kiosk over the phone, as it disrupts the retailer’s daily operations and often leads to your number being added to the locations blocked numbers list or a hostile response from the store. While a very small fraction (about 0.01%) have succeeded this way, it’s not worth the risk.
After you have found a suitable location, contact the store, and attempt to gain permission to remove the unit. Ensure to never impersonate a Redbox employee, technician, or worker. It is always best to be honest, and explain the situation to someone like the general manager at a store, and see if they are comfortable with removal of the unit. A popular line with higher success is saying you are an independent tech recycler and that you want to remove their Redbox at no cost to them. If they aren't, try your luck at a different location. It is illegal to remove these units without permission. It is always recommended to get a contract signed to prove you were authorized to remove the kiosk, A good starting contract (made by Redcodi) is available in the Redbox Tinkering Discord server here.
#Determining the correct key to open the kiosk
To remove the front mounting plate you’ll need to open the door to access the front bolts. The locks you’ll encounter include:
- RB101 — 7-pin (legacy; still present on some kiosks). These are known to be easily picked with an 8-pin tubular lock tool.
- TC0035-A — 12-pin (the most common lock found on ~90% of field kiosks).
Keys below were replacements when former employees refused to return their keys in some markets:
- TC0035-B — 12-pin (less common)
- TC0035-C — 12-pin (rare)
Although TC0035-A is the prevalent type, some units use TC0035-B or TC0035-C. Because all TC-series locks look identical, the only reliable way to confirm the correct key is to try it in the lock.
#Weight
Individuals have reported that these kiosks can weigh as much as 850 pounds, reducing to around 600 pounds without discs. Some employees have claimed the unit is closer to 350 pounds when empty.
Ensure any tools you're using can at least support 800 pounds before moving anything - the more, the better. High-rated dollies may be easier to move a machine with as many have additional sets of wheels you can deploy to roll heavy loads on.
Some items have been weighed, while others are estimates (mirror of):
- Bare kiosk shell and door is ~300 lbs (weighed by kas)
- Carousel, containing a central solid steel rod and plastic platters (decks), weighs ~100 lbs
- Unloaded kiosk weighs ~600 lbs (weighed by kas)
- Loaded kiosk weighs ~800 lbs
- AC unit is 56 lbs (weighed by iiPython)
- Picker Assembly weighs ~30 lbs
- Air exchanger is ~32 lbs (weighed by iiPython)
- Screen is 11.6 lbs (weighed by iiPython)
- Carousel motor is 8.8 lbs (weighed by iiPython)
- Carousel shaft is 17.5 lbs (weighed by iiPython)
- Linear rail is 15.5 lbs (weighed by iiPython)
- Internal space heater is 1 lb, 15.2 oz (weighed by iiPython)
- Shaft collars are 1 lb, 2.1 oz each (weighed by iiPython)
- Monitor cooling is 3 lbs, 11 oz (weighed by iiPython)
- Carousel top crossbeam is 5 lbs, 1.1 oz (weighed by iiPython)
- A single Redbox disk and case weights 2 oz (weighed by kas)
- A single empty Redbox case weighs 1.5 oz
- A fully loaded kiosk worth of disks (600) would weigh ~90 lbs
#Recommended Tools For Outdoor Kiosks
- Socket set + extender (socket size varies)
- Ensure you have at least a ¾" socket and a 14mm socket as these have been reported as being used out in the field.
- Some units (including doubles) have a different bolt layout which will require around a 15mm socket and a lot of effort to remove.
- Penetrating oil for rusted nuts (PB Blaster, Kroil)
- Sawzall or Angle grinder with a cut off disk for rusted bolts
- Appliance dolly rated for at least 800 lbs
- Philips head and Flat Screw Drivers
- Adjustable Crecent Wrench
- DiCs or diagonal cutting pliers for cutting the power on outdoor kiosks
- Wire nuts and tape for terminating the electrical
- Non-Contact Voltage Detector for double checking for live wires
#Indoor Kiosks
There isn't anything too notable about how these kiosks are installed. As far as it's known, all indoor kiosks are simply resting on nylon feet and have no additional mounting to the ground. Power is supplied via a GFCI Protected wall plug and can easily be unplugged. We recommend putting it in test mode before unplugging if its plugged into the wall upon arrival to avoid electrical shock.
These can be lifted and removed from a store with a sufficiently rated dolly, such as an appliance dolly.
For cleanup, consider bringing with some basic floor cleaning supplies such as a broom. However, it's likely staff on-site will be ready to clean up after you as you've prearranged pickup. To avoid creating a slipping hazard and potentially injuring someone, do not use any cleaning equipment that will wet the ground.
#Outdoor Kiosks
Make sure to clean up all hazards after removing the Kiosk and Promo Lightbox.
Leaving any hazards behind can lead to civil and/or criminal liability.
Most, if not all, outdoor kiosks are connected to power via a custom wired connection to the building's electrics. Some buildings will have external breaker panels nearby for their Redbox. However, not all installations will have this. Ensure power has been disconnected before cutting any wires or removing the kiosk.
Some outdoor kiosks are bolted into the ground they were set on. If this is the case, it's possible the original bolts have seized into the ground. This will make removal more difficult without the right tools.
Other outdoor kiosks are mounted with a retaining rail holding the original nylon feet to the ground. This can be unbolted (14mm) to allow removal of the unit.
Take proper care to ensure no exposed live wires are left after removing an Outdoor Kiosk (This can easily be done by keeping power off to the breaker and capping each wire individually utilizing wire nuts at the ends). Take all signage and don't leave any hazards behind, such as partially removed bolts embedded in the ground. If any cut bolts are sticking out of the ground, a solution might be using a cut-off disc on a grinder to cut them flush with the ground. Be sure to clear away flammable detritus (leaves, paper, etc.) before using the grinder.
#Kiosk-Mounted Accessories
If you plan to keep the lightboxes and use as a display and not run the kiosk wiring through the lightbox, it is recommended to remove the wiring that would lead towards the kiosk unit to prevent damaging the LEDs or the exhaust fans.
Kiosks often have accessories on them, such as signage and promotional devices.
#Movie Promo Lightbox
These large, tall lightboxes are secured to the side of the kiosk with large Philips head screws that have Robinson/Square #2 drive in the middle of them. You can remove these screws to release the sign, then screw them back in to avoid losing them. You may need to move the sign on its hinge to reveal the screws.
If the sign is not hinged, you may have to open the lightbox to access the screws. The lightbox can be popped open with a flathead screwdriver at each of the spots with a lock cylinder. These lightboxes are quite flimsy, expect it to open easily. If the light is blinding you, there's a switch at the bottom to turn the lights off.
#Redbox Sign
The traditional, curved Redbox sign is affixed to the top of the kiosk. It shouldn't need to be removed, but it does make the kiosk around 7 feet tall on the ground - even taller when up on the wheel of a dolly.
todo: removal info
#Advertising Display
Some Redbox kiosks (apparently ~10%) were equipped with advertising displays on the top. These replace the traditional Redbox Sign mentioned earlier. These advertising displays are significantly taller than the original Redbox sign, and appear to only have been present on indoor units, and are plugged in to a separate outlet from the kiosk.
These units are bolted onto the top of the kiosk using 4 hex bolts, which can be easily removed with a ratchet and socket set. To gain access to these bolts, the front plexiglass cover needs to be lifted out by pulling outwards on the cover (held in with slots in the housing for the bezel to slot into) giving access to the panel, which can then be lifted out by tilting it up from the bottom and unplugged, given that it is held in with similar means to the plexiglass outer cover. With the panel out, and put in a safe location, the bolts (located in all four bottom corners of the housing) can be removed, allowing the entire unit to lift off from the top of the kiosk.
todo: elaborate on bolt types
#High Outdoor Signage
Although it isn't common, some outdoor kiosks had a large fluorescent light fixed on the back plate, right above the signage. This large light usually lit up at night to help people see the kiosk easier. These were more common on double and single outdoor units at Walgreens Stores due to poor lighting at night. These bulbs are likely burned out as techs tended to not service these in some areas. This light makes the entire back plate much higher, so you'll likely need to remove it if you're trying to move your machine to an indoor location (like a garage).
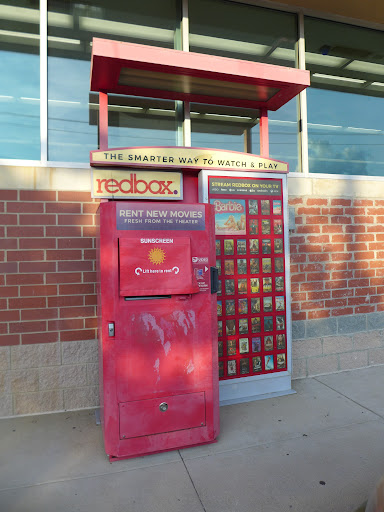
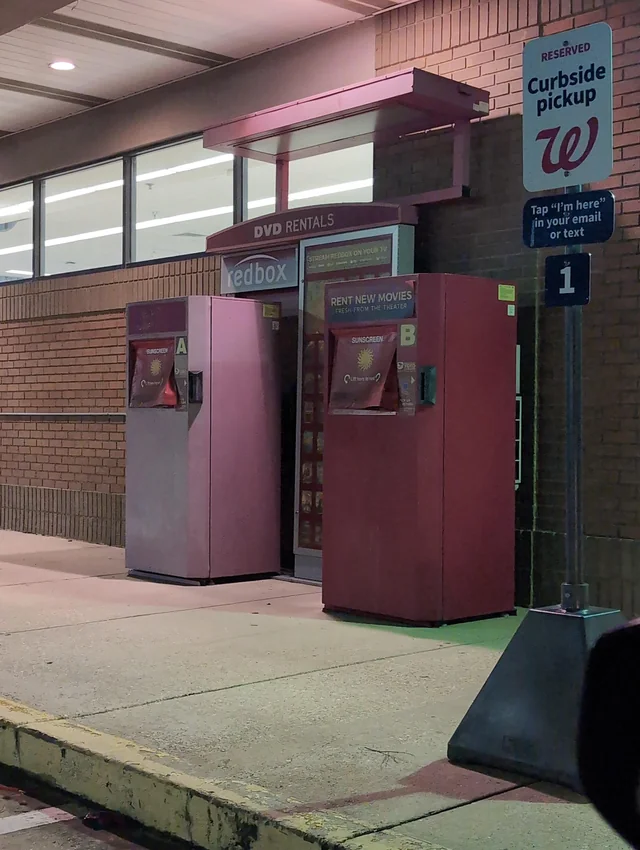
#Removal
These steps occur after Step 4 in Standard Outdoor Signage removal.
- Use a 14mm socket to remove two bolts from the back (usually the bottom two or top two will do the job though the top two is usually the easiest)
- Rock the Top Light side to side until it comes off. Be aware of glass as these likely have shattered and is best to not breathe in or touch mercury as it can be dangerous.
- Use wire cutters to fully disconnect the Fluorescent Light from the signage display
#Standard Outdoor Signage
Many units outdoors have elaborate signage to draw attention to the kiosks. These are known as Standard Outdoor Signage
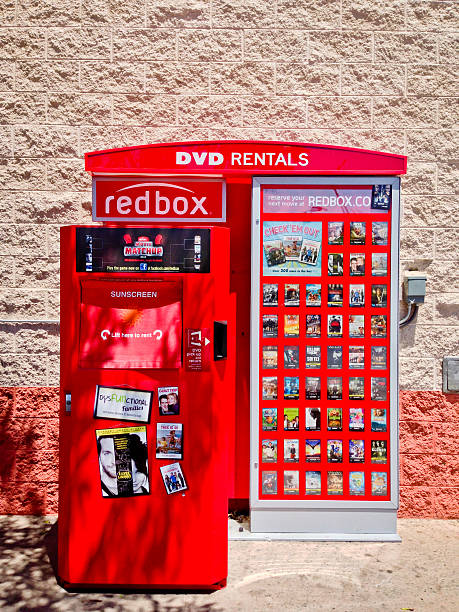
#Removal
If your Outdoor Signage uses LEDs, which is in newer installs after 2016, you may skip step 1.
Also it is best to cone off the area you are working in, which includes parking spaces and if anyone is parked there longer than 10-15 minutes of being there, notify management on duty. If you cause damage anyone's vehicles, you will be held responsible.
- Remove Fluorescent Bulbs from the art display (Requires flathead or pry bar on top and bottom locks to pop it open) and top of the display (Requires removing 4 nuts, but you could use pliers to get these out.)
- Pry out the metal piece below the Advertisement Signage
- Unbolt the signage from the bottom with a ¾" socket and sometimes you may need to use a 14mm socket. (If spinning in the concrete, you will need to cut the bolts with an angle grinder to get them out)
- Drop the lightbox to the ground (this will make noise and is best to alert the Store Manager or Authorized Personnel on duty that they may hear banging)
- Clean the area and cut the studs hanging out the ground
- Lift back up and load onto the trailer or truck
#Outdoor Roof Signage
These displays were exclusively designed for McDonalds. Most, if not all of these Signages, have likely been scrapped since the contract with Redbox expired in 2011. This left it up to the Franchise Owners to negotiate a new contract to keep the kiosks on the premises or to remove the kiosks entirely. Removal for remaining ones is possible as McDonalds are under franchise ownership and corporate will just tell you to talk to the owners. Most of the bolts used were industrial grade and may require cutting them out. Note that it will drop forward instantly so best to remove the kiosk first and take all fluorescent bulbs out before cutting.
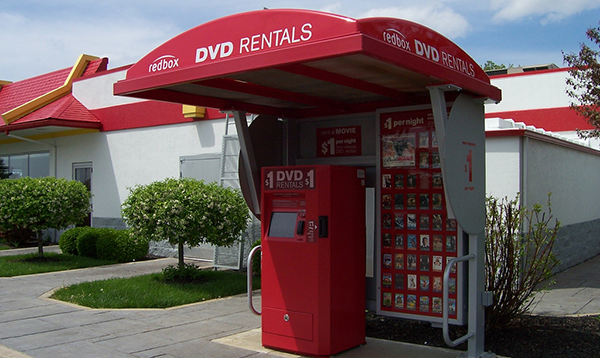
#Disc Removal
Avoid removing the discs at the store where the kiosk is located, as this may disturb customers or employees and cause issues. If you choose to remove discs on-site after opening the kiosk door, you do so at your own risk.
If the unit is transported on its side, it may become jammed and/or damaged. It is recommended to open the back and remove any loose discs before powering it on after unloading your kiosk.
#Air Conditioner Removal
Do not remove the A/C unit at the store where the kiosk is located—this should be done off-site, as all kiosk components must be taken with you. If you plan to scrap the air conditioner, you must have the freon properly discharged by a certified HVAC technician. Releasing it into the environment is illegal and hazardous to breathe. Additionally, some scrap yards may not accept A/C units, so research disposal options beforehand.
#Removal
Though this is possible, it is not recommended for kiosks that will be outdoors
- Remove the security bits from the back of the kiosk
- Unplug everything and set the unit flat on the ground
- Remove the bolts from the back plate. Grip pliers may be required for the gold piece on some units. If they are seized, you may need to apply WD-40 or something to break it loose. If none work, you may have to use an angle grinder to cut the bolt off
- AC unit has been removed. Now put the back plate back on the kiosk and put in the security bits.
#FAQ
Q: Should I contact the store over the phone to inquire about removing a kiosk?
A: It is unlikely that contacting the store will lead to a positive outcome, as you will either be told "no" or directed to corporate. If you wish to remove the kiosk, it is best to visit the site in person and speak directly with the management on duty. You may call ahead to confirm the kiosk is still present, but the only exception to this is in the case of a store closure with an existing kiosk on the premises if you inquired previously and were told no.
Q: What should I say when they ask what I intend to do with the kiosk?
A: Be straightforward and honest in your response.
Q: What should I do if the management becomes hostile or asks me to leave?
A: Hostility from management is extremely rare and there is the saying “There is always bad eggs in the nest” when it comes to management. Politely wish them well and leave the premises. Responding with hostility will only harm your efforts and make it more difficult to proceed with the kiosk removal.
Q: I followed all the necessary steps but was still told "no." How should I proceed?
A: Maintain a civil demeanor, and leave behind a business card or contract with a contact number. Engaging in an argument over being denied will negatively impact your ability to remove kiosks in the future, both for you and others.
Q: Is it acceptable to follow up with the retailer if they previously said no?
A: It is possible, but be mindful not to overdo it. A follow-up after a while is appropriate. Assume after a couple of tries, the next couple of times will be the same exact answer.
#Disclaimer/Safety Message
This guide is provided by Redbox Tinkering Group for general informational purposes only and does not constitute professional or safety advice. Kiosk removal is inherently dangerous. Units may weigh 500–800 pounds and these units can and will try to tip over. Movement should be limited to controlled dragging on the nylon feet or sliding on protective skates/sliders, moving blankets, or low-friction pads placed under the feet, with floor protection used to prevent damage. All activities related to handling, moving, transporting, or working near kiosks are undertaken at participants’ own risk, including risks of crush injuries, tip-overs, strains, falls, equipment failure, property damage, and other hazards. Redbox Tinkering is not responsible or liable for any injury, death, loss, or damage to personal vehicles and/or trailers arising directly or indirectly from kiosk removal or use, and responsibility for death or bodily harm is expressly disclaimed. Safe practice calls for two or more capable adults—where “adult” means 18 years of age or older—and participants aged 16–17 may assist only when accompanied by an adult and must be demonstrably capable of moving heavy equipment. Use appropriate PPE and proper, load-rated equipment and tools such as straps, wheel chocks for transport vehicles, and hand tools, with qualified personnel and in compliance with all applicable laws, site rules, and manufacturer guidance. Participants are solely responsible for site housekeeping, including removing debris, packaging, and tools, preventing trip, electrical, or crush hazards, and restoring the area to a safe condition. Negligent acts or omissions such as leaving hazardous conditions or failing to secure the site may expose responsible parties to civil and/or criminal liability, for which Redbox Tinkering bears no responsibility. Above all, we want members to stay safe and have a good time on the field and enjoy their kiosk. Do not ruin it for everyone else.